|
A right-handed drummer will usually set his or her drums up like this:
The snare will be between the legs, the hi-hat on the left, the toms spread out towards the right (some left-handed players reverse this). The right foot will play the bass drum, the left the hi-hat. He will usually put the ride cymbal to the right of the toms. The right hand will play the ostinatos on the hats or ride cymbal, and the left will keep the "backbeat" on the snare. This is how most people learned to play, and they play like this until they die. What happens with this technique? The right hand will usually become very fast and strong, and the left hand will stagnate and remain weak. Even if one practices a lot of rudiments, the majority of time a drummer sits behind the kit and plays is not taken up in doing rudiments! He plays to music. So, his left hand remains weak. Now, two things to note.
This section will introduce you to the concept of amidextrous drumming - leading with your left hand - and give you some exercises and examples to get you started [I will be addressing the right-handed drummers here - if you're left-handed and set your kit up that way, reverse the examples below: the principle will work for you,too]. What will this mean to you?
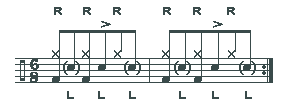
In most kit drumming - rock, jazz, folk, ballade, country - the drummer sets up an ostinato on the cymbals with his or her right hand and plays the rhythm pattern on the rest of the kit against this ostinato, hitting the backbeat on the snare with the left hand. The example above shows a basic rock pattern; we're riding in 4's on the closed hats, hitting the snare on 3 with the left hand. The sticks are crossed, and in order to hit a tom with the left hand during this pattern, we have to bring it back, around, and over the right hand, hit the tom, and put it back under the right hand to hit the snare again. Not very fluid.
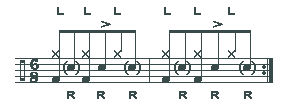
This example shows the same rhythm, but we're playing the ostinato ride on the hats with the left hand, and the backbeat on the snare with the right. Try this yourself. All of a sudden, the entire kit opens up to you because your backbeat hand is no longer trapped under your ride hand. You can now play interesting grace note patterns, quick fills, and interesting tom patterns with the right hand, while keeping the ostinato going with the left. You can even put a crash next to the hi-hats and hit that with your left hand as well! Imagine the possibilities!
This technique will be foriegn at first and will take some getting used to. However, if you persevere and make this a part of your practice regimen, you'll be doing this on a gig in no time. And you'll notice greater speed and strength with your weak hand; while at the same time you'll see an increased ability to play complicated stickings. Any pattern or rhythm you can play leading with your right hand, you can play leading with your left. As you transpose rhythms, you'll notice that you are forced to think about what you're actually playing, rather than just playing by rote. This can't help but improve your mental facility. Some exercises follow.
Some examples of ambidexterity. In each pair, the first example is the standard ostinato sticking; the second the alternate sticking. Practice them slowly, building speed as you become comfortable. Steadiness and feel are of primary immportance: chops will naturally follow.
Here is a funk rhythm. Notice the grace note in the second measure. Play the two eighth notes at the end of each measure with slightly less force than the main backbeat on 3, but not light enough for a grace note. Work on this with the hi-hats and the cymbals, concentrating on not only the feel, but on what your hands are doing; you usually don't think about this!
Here's the same pattern played leading with the left hand. This is a bit trickier than the rock pattern shown in "Concept", so it will take a bit more time to feel comfortable. It's important to note that we're not changing the foot patterns: the bass drum is staill played with the right foot, the hats with the left. You concentrated on the sticking in the typical pattern above for a reason: if you get in the habit of thinking what your hands are doing normally, thinking about them in the alternate sticking will be easier.
This is a basic shuffle pattern played on the hi-hat and snare, as opposed to both hands on the snare. Note the grace notes on the "and" beats and the accent on the middle "and" beat of each measure. These dynamics allow the pattern to "bounce" a bit more than a straight dynamic would. If you're not familiar with this pattern, or you've never played it with the cymbals and snare, work on the typical sticking until you're smooth before moving on.
Here's the shuffle pattern led with the left hand. This may seem very difficult at first, but it should be one of the easier ones to master due to the naturally fluid style of the shuffle rhythm. Concentrate on the dynamics. The trickiest thing about this pattern is starting on 1 with the left hand while hitting the bass drum on 1 with the right foot; you're learning a whole new way of thinking about drumming. Once you have this one down, try moving around the drumkit with first your right hand, playing toms instead of the snare - keep the left hand on the hats. When you've got the feel for this, move both hands around the kit. Once you've mastered that, try alternating between the typical sticking and the alternate sticking every two measures! This will loosen you up!
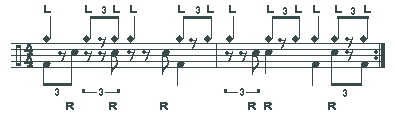
Here is a jazz pattern. It's a basic pattern, but I've thrown in some curves. This assumes you're making some kind of progress and are ready to move on to the next level. The right hand is keeping a simple jazz triplet ostinato, while the foot and left hand are playing against this and each other. This exercise assumes a certain level of independence. Make sure you have this down before going on. If you've never played a jazz rhythm before, concentrate on the ride cymbal pattern and play the bass drum on 1 and the snare on 3 to start.
Here is the alternate sticking. The left hand leads with the ride cymbal, the right hand and foot playing against this. In order to play this, I advise you to set up an alternate ride cymbal to the left of the hi-hats. Otherwise, you'll be crossing over to the right with your left hand, thus defeating the purpose of the exercise. As with the shuffle pattern, try moving first the right hand around the kit, then both hands. For an added measure of difficulty, throw in a hit-hat beat on 2 and 4. Again, you might try alternating sticking every two measures as an exercise.
I will be placing other examples on this page as I develop them. Try to come up with your own: take any traditional ostinato pattern you've been playing and play it ambidextrously. For greater independence and fluidity, try playing them both ambidexerously and in a linear fashion: for more information, see Linearity. Let me know what patterns you've developed.
|